Saturday, December 29, 2012

Inside-out Thank You Card/Tag/Bookmarks

I feel so lucky and grateful this year, because I have many students, and many Thank you cards to write. I needed a quick and inexpensive card. I came up with this Inside-out Thank you card because I wrote the message on the envelope, and not the card. The card is a bookmark made from a tag, so it could also be hung from a tree or tacked on a bulletin board.


Inside-out Thank you card/tag/bookmark


Supplies;
Box of 100   4  3/4 inch  x  2  3/8 inch  shipping tags from office max.
A stack of coin envelopes I had from a friend (available at office max)
1 Mr. Huey's color mask
Heidi Swapp Color Shine Spray in Primrose
Ribbon on hand
Border Punch on hand
Thank You  rubber stamp
Powder Puff Chalk Ink in Tahiti
Tape Runner (Xyron 5" if you have one)


First take the wires out of the tags and put them aside for later craft project. Lightly mist the tags on one side with Color Shine. I wish I was a better photographer and you could see the amazing shimmer that these Heidi Swapp mists have, The colors a beautiful! Try a bottle and you will be hooked.
Step two flip tags over and spray through a Mr. Huey's Mask. (It's a plastic sheet with a pattern cut into it and the color does not go where the plastic is laying. See Heidi Swapp's page for technique video)

Find a quote that you like, print and cut to fit tag. I always go to Quote Garden.com
I wish I had that 5" Xyron for all the sticking of quote to tags, but I just used a tape runner.   After tags are very dry, punch edge. I have an Oriental Trading border punch.  Chalk ink the bottom edge of tag. Cut ribbon in 6" strips and add to finish.
Stamp "Thank You" onto the outside of the coin envelopes and write your message.
Tuck tag into the coin envelope. If you want to mail these out, you must put the coin envelope in a standard size mailing envelope. I have a lot of students that I will see on a daily basis and will be handing these out in the coin envelopes.


Saturday, December 22, 2012

Spotted Canary School


http://www.spottedcanary.com/

I'm very excited, I just finished all of my training classes to be a Certified Spotted Canary School instructor. Above is the link to the web site where  you can find tons of (free) on-line classes and ideas for crafting projects.
I'm anxious to begin teaching and meeting new people with the same interests, looking forward to starting the new year off with creative time planned in to it.
The training course included paper crafts, textiles, design, textile arts, jewelry making and more.  It was well worth the time I put into it. Go and check it out some of the classes and great E K Success products for yourself.   

Thursday, December 20, 2012

Scrabble Tile Door Hanger or Ornament

I saw this cute idea on an episode of My Craft Channel which I watch EVERY morning, really. (I have applied to become a My Craft Channel SuperFan and I'm crossing  my fingers they pick me!)  
This was a Xyron sponsored video. I took it a step or two further by turning the ornament idea into a door hanger and adding a bell (12 for $1 at Dollar Store) to the bottom. Call it a "Green" personal door alarm!

I used goop glue instead of Xyron's sticker machine because I knew that hanging on a door would take a lot of bouncing around, and Goop or E6000 hold the best.
I also inked the edges of the scrabble tiles, and added a spray mist for *sparkle*.

Recycled Coffee Sleeve Gift Notebook

Oh my gosh, this Holiday season has already been a whirl wind of events ans parties! I've been so busy wrapping, crafting, and trying to squeeze my actual job in on my spare time. This is a quickie cutie gift that can be made in a snap. Give it with a gift card, or a nice pen set.
I chose to keep the Starbucks logo on this one because the gift was for a coffee lover, but I have made them covered with a pretty paper.  Just press a coffee sleeve flat, and cut in half, or cut to desired size. trace around onto plain paper that will fill the inside of the book. If you don't have a Zutter binder or other binder, punch holes and tie together with ribbon (see my gift card holder visual clue).  I have inked the edges of the cover and of the paper for a vintage look, also sprayed the cover with Tattered Angels Glimmer Mist. 


Monday, December 3, 2012

Up-Cycled Wool Baby Booties

Ho Ho Toes Baby Booties
These sweet little booties used to be an "ugly sweater". After felting the sweater by washing and drying it several times, I cut out the wool just like a fabric. Lucked out again at a rummage sale where I found the adorable pompons for the toes. I blanket stitched around the edges and added pearl buttons. I also made a pair with cashmere, but it didn't felt as well as the wool and they slipped off of the baby (craft fail ) I would have taken pictures for a tutorial, but I didn't have a blog when I made these last winter. I would be happy to send directions if requested. This baby is going to have a little sister or brother soon, so I will be making more.

"Bird Song" Inspired Cards

As I mentioned, I have become a paper connoisseur . These are just a few of the thank you cards I designed with this gorgeous paper that I won (Yay!) from Graphic45. The line is called "Bird Song". (See clip-board project below to see more projects with this paper).

Rubber Cafe Inspired 2012 Christmas Card

This adorable card was inspired by Melissa in a class she taught took at the Scrapbook Expo. (Please check out her blog and her fantastic store, "The Rubber Cafe" link on the right).  I used two stamps I purchased at her booth as well as her "Scrap Happy" Glue. I used foam squares, paper on-hand, Stickles glitter, and alcohol markers.

Again, this was a first for me coloring with blendable alcohol markers, what fun!


I really liked the idea of a stand-up scene card. I added a strip of very shiny silver paper and the reflection gives such a nice effect on the skating bunny, Warren.

Felted Wool Jewelry made from Ugly Sweaters

Sushi Beads

I know! don't they look great? I made these beads out of old ugly sweaters that I cut up, rolled and felted.

Yes, it took a long time, but this is a gift for my sister. I think the presentation is really great too (yes I am bragging). This was my 4th attempt.


The Licorice Allsorts necklace is a beauty as well! For my British mother, Allsorts are a candy favorite.
This was my 3rd attempt.
Second attempt at felted wool beads
First attempt at felted wool beads

DIY Gifts

It's that time of year! Actually, for me, it's gift giving time all year! I love making gifts for family, friends and students. These are examples of gifts or "extras" that make a gift special.
Scented Key chain

It's SEW easy to make these key chains. I have made them with lavender, but for this season I've stuffed them with crushed cinnamon scented pine cones.
Pine cones (Purchase at any craft store, one bag fills tons of key chains. I chose not to make the pine cones myself due to lack of time)
Scrap 2 inch wide, 8 inch long ribbon
Eyelet
Key ring
Tool needed- Crop-a-dile or an eyelet setter.


Fold ribbon in half and sew all the way down the sides. I prefer grosgrain ribbon because it doesn't slip in the machine. Stuff with lavender or other scented stuffing, sew closed about 1/2 inch from the top. Punch hole , set eyelet, add key ring. I added an ice skate charm to this because it is for one of my skating students.
They look really cute on packages and give it thet extra special something.


Skating Students' Gifts
Iv'e been teaching figure skating for a very long time. Every spring and winter I give a little something to all of my girls(ages 9-14) for working so hard. because I have to give to so many girls, it could get expensive so I have become very creative. This year I am giving a "mini-spa treat" which includes a little bottle of lavender oil, a lavender filled sachet and a battery powered tea light. The sheer sachet bags, the gift box/bags, and the tea lights are all from The Dollar Tree.  The white boxes are found in the wedding section. I used Heidi Swapp's AWESOME "Color Magic Spray" in mint green and chartreuse to add a little sparkle and shine to the boxes and the ribbon. (This is the first time I have used Color Magic and I think I'm addicted. I ordered a starter kit from "My Craft Channel" and I can't wait to play with it more!)
I used some silver washi-type tape with inspiring words around the candles. I hope the girls will enjoy them.


These photos look a little funny because the acrylic reflects back, and the paper is ModPodged to the back. They awill be a gift that was inspired by both a Theresa Collins and a Lori Allred (Inspired by Pinterest) demo on "My Craft Channel". If you haven't checked out that daily web-show yet, you are really missing out!  I found a huge box of these acrylic 7"x 9"clip-boards at a local rummage sale for a few bucks. You can purchase then at office supply stores, I just got lucky. I used ModPodge to glue double sided paper to the back side of the board. Then addded assorted ribbon and bling on-hand. I'm lucky to have a crafty husband who made stands for them so that they can be used as a display for a picture calendar, or notes. I used hot glue to attach the ribbon and bling.
 We are going to give them with a 2013 calendar (free printable on-line at calendarlab) and a photo greeting.

For these I used  Graphic45 "Bird Song" papers. 

Sunday, December 2, 2012

Summer Scrapbook from Scratch

Tired of using the standard 12x12 inch scrapbook size, I designed my summer album from scratch. Every edge is ruffled or scalloped, and every page is bound to the other with gaffer's tape (purchased a bunch of it on "My Craft Channel" web site). The front and back covers are black chipboard.  
I used chalks, washi tape, inks, sprays, masks, glitter, sand, doilies, stones, ribbon and vellum... every thing in my  stash, no limits!


Saturday, December 1, 2012

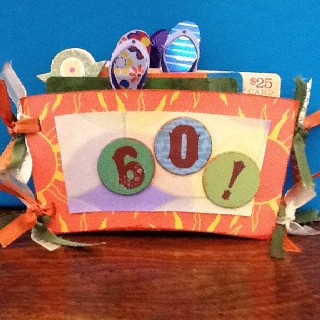
Re-Cycled Coffee Sleeve Gift Card Holder

Yes, this awesome gift card holder for my hubby used to be 3 cardboard coffee sleeves. 


1) I glued the bottoms shut with Tacky Glue.
2) When I made this back in July, I didn;t have spray inks or glitter yet, and I sprayed the sleeves with inks that I made myself. (One pack of Koolaid, spray bottle, water). Now after using, I prefer the both Tattered Angels and Heidi Swapp Color Shine mists.
3) I covered the cover with paper and added paper embellishments and notes inside with Scrap Happy Glue.
4) I then punched two ribbon punch holes and tied together.
5) I slid a gift card into each sleeve and put a little flip flop sticker back to back with a matching sticker on the top of each card so they could be pulled out easily. He loved it!

Monday, November 19, 2012

DIY Angel Candle Decoration

Here is one more quick and easy Dollar Store Craft.


Supplies; 5 glitter Angel ornaments
One large led pillar candle and 2 led tea light candles
One small piece of transparency film or velum.
Alcohol markers (sharpies would work as well)
Hot glue, and E6000
With utility scissors, cut off hanging loop on plastic ornaments. Trace around one on to a piece of transparency/velum. Color on the velum however you want to. Cut out, and glue with Goop or E6000 to the back of one ornament, then make a sandwich and glue another on top.
Hot glue the other 3 ornaments at wing tips all the way around.
Take bottom off, and guts out of the large pillar. Replace with a  tea light in the base, and a tea light on top. This gives it a luminous glow all over.

Sunday, November 18, 2012

Miniature Christmas Scene

This is a variation on the "Winter Under Glass" decoration. I added a little mood lighting on the inside with a blue led light from a craft store. It gives it a nice glow.


Winter Under Glass

I really had a lot of fun with this month's Dollar Store Crafts Challenge. I have always loved miniatures, so these two projects were a joy to make.
Supplies: Large glass bowls/jars
A few miniature figures and trees
A mirror
An Ornament
A battery powered tea light
A glass tea light holder
Snow felt fabric
Foam square
Artificial flower
Artificial Bird :)
On Hand- Goop, E6000, Tacky Glue, hot glue.
Trace around mirror on to snow felt then cut and glue to mirror. I use Tacky Glue. Then add your figures as you like, I use Goop. While setting to dry, place bowl upside down and use E6000 to glue tea light holder to top, and hot glue for plastic ornament to glass tea light. (It is so important to use the right adhesive for the right material! I'm thinking about adding a blog that;s just about which adhesive to use for what.)
Glue top to base with E6000. (Open a window when you use E6000, it has a strong odor.) If this is a gift, left it air out a couple of days before gifting.


Fall Rose Bouquet made from Leaves

So, here I am Sunday morning waiting for the Turkey to finish cooking (we do Thanksgiving early) and updating this post so that you (dear reader) can add to your fall decor for Thanksgiving. I saw the idea on Pinterest, and updated it a bit. These are leaves found outside, rolled into roses, and hot-glued to Dollar Store Flower stems. This turned out so well, I wish I had saved more time to make a few dozen.

Items used;
Leaves
Hot Glue
Dollar Store plastic flower stems and leaves (flowers stripped off)
Dollar Store Turkey Vase


Step one, pick up leaves in the colors you like. They are best if just of, or picked off of a tree, because they get too dry to work with.
Fold top of a leave over and add a dab of hot glue to edge, then alternately roll leaf, and add hot glue, repeat. I used 5-6 leaves per flower.
Paint each finished flower with Mod Podge gloss to seal and preserve color.

Saturday, November 17, 2012

Graphic45 and the Renaissance Faire

 I'm a paper snob. I have to have beautiful  high quality papers to work with. My current favorite is Graphic45. I actually found myself trying to find pictures to work with the paper instead of the other way around! These two layouts feature pictures taken at the Bristol Reniasance Faire. Many techniques were used including layering papers, chalking edges, wrapping baker's twine, scrunching paper and  crackling watch faces. I had taken a class at the Scrapbook Expo with Leanne Ostergard (follow her on Pinterest or My Craft Channel).
Leanne gave us a tip about using busy paper, it was add more layers! Great tip, thanks! She also mentioned using floral papers for boy pages, and I tried that as well. Turned our great. Just kept the colors muted and added a couple of masculine elements.

Pazzles Inspiration Project

I wish I had taken a picture of this before I framed and gave it as a gift, but I didn't have a blog, or a Pinterest page back then! It is a layered paper cut project that I cut with my Pazzles Inspiration machine. It's from a photograph of my girlfriend and her sweet best friend, Lilly. I uploaded the photo, edited it, vectorized it, and cut several copies out of 4 different colors of paper. Can't wait to try this again, the results were wonderful.